Moving Rainbow Hardware
Arduino Moving Rainbow Kits

The Moving Rainbow Kit is based on a strip of 12 "addressable" Red, Green and Blue (RGB) Light Emitting Diodes (LEDs). The basic LED strip is easy to connect to your Arduino. We only need a single data signal (and power and ground) to connect the entire strip to our Arduino.
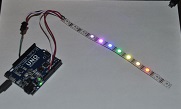 Arduino connected to the LED strip. Note that the red wire is connected to the +5 pin on the Arduino and the white wire is connected to ground (GND). The data wire is connected to pin 12 which is configured as an output data pin in the Arduino.
Each pixel in the strip has a red, green and blue LED. We can control how bright each of these three LEDs is by setting a number from 0 (off) to 255 (bright). Since each a LED on the tape has 3 LEDs we have 36 total LEDs we can control. Note, you can cut the tape between any of the LEDs to make smaller strips.
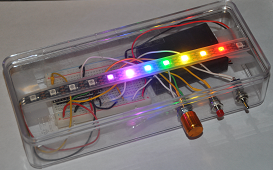 The photo above shows the LED strip in a kit that includes a solderless breadboard and an Arduino nano. Controls outside the box turn on the power, reset the processor and change the display mode of the kit.
We will use a software library provided by Adafruit called the "NeoPixel" library to turn lights on and off. Our LED strip has 12 pixels. However we start numbering at "0" to show how computer science people are usually off-by-one digit when they access memory locations!
If you want to purchase your own parts, check out our Bill of Materials